Open topic with navigation
(continued from Debtors Transactions)
Debtors Invoice

|
It must be emphasised that invoices for bookings cannot be issued via this screen in the debtors application.
Bookings invoices must be entered from either the FastBook or GroupBook applications or the Operations > Bulk Invoicing application. Details on bookings invoicing is in The Fastbook and GroupBook Training Guides.
Being able to issue invoices from Debtors allows invoices to be entered for non-bookings related items—e.g., Advertising contributions from agents; Rents owed by other parties etc.
|
To insert a Debtors Invoice, first select the Debtor the Invoice is for, and then select Transactions in the side bar. Click on the Insert button  in the Button bar. From the Insert Transaction screen displayed, select Invoice.
Invoice Header
Screen Shot 27: Debtors Invoice Header Screen
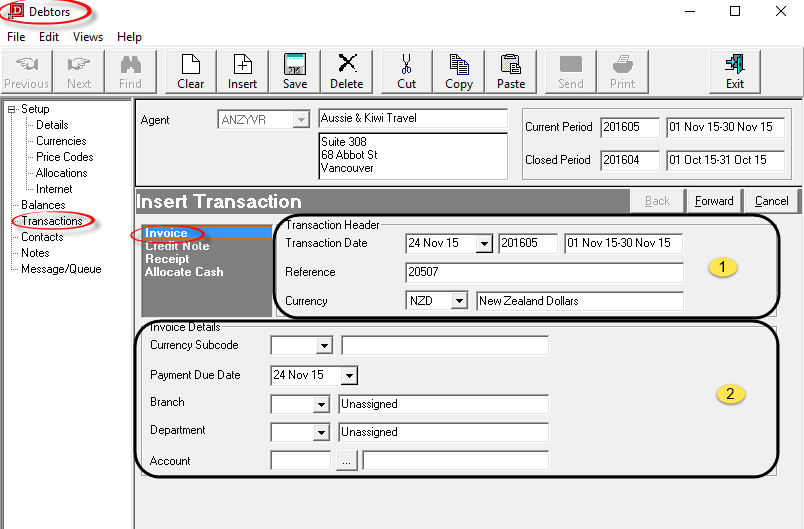
Transaction processing follows a Wizard which leads through all of the required stages. This first screen is the Invoice Header screen and it contains the following fields:
 Transaction Header Section
Transaction Date (Date)
This is the date from which the Transaction Period (as described under Accounting Period Definitions) is determined. The date that displays in this field is calculated from the Debtors INI Setting AR_INVOICE_DATE. That INI setting is used when calculating the transaction date for a Booking invoice (being created within the Bookings applications). The INI setting can be System Date, Last Day of Current Period, Travel Date or Last Service Date. If AR_INVOICE_DATE is based on a booking date, then the default transaction date in this screen in Debtors will be current system date because the invoices created here are not booking related invoices. In this example system, the INI setting is System Date, so today’s date is used as the transaction date. The transaction period number which the transaction date is in displays to the right of the date field, and the corresponding Start Date/End Date of the accounting period display to the right of the period number. The transaction date can be overridden. This could affect the transaction period and the aging of the invoice if the month is changed. The transaction date must be in an open accounting period — the system will not allow a transaction date which is in a closed accounting period.
Reference (20 Chars)
The Invoice Number. This is sequentially allocated from the System INI setting AR_NEXT_INVOICE. This field cannot be overridden unless the Debtors INI setting AR_MANUAL_INVOICE is set to Y.

|
It is not recommended that the Reference field be accessed and reference numbers manually changed. The system will not allow the same reference number to be used more than once for the same transaction type for the same Debtor. If manual invoice referencing is permitted, the danger of this occurring increases.
|
Currency (Drop-down)
The currency that the invoice will be issued in. This can be changed to any of the currencies that are attached to the agent. The currency which was checked as the default in the currencies screen during agent set up is the one which displays by default. (see Default Currency ).
 Invoice Detail Section
Currency Sub code (Drop-down)
A currency sub code can be displayed or entered here. If a sub code has been entered against the agent, it will be defaulted to this field. (See Currency Sub Code).
Payment Due Date (Date)
This date is calculated from the payment terms for this Agent/Currency as entered in the Agent Currencies Screen. It can be overridden if required.
Branch/Department/Account (Drop-downs/Search)
The GL Account that the revenue from this invoice will be posted to.

|
When a Booking invoice is created (within the Bookings application), the revenue account(s) are known based on INI settings, so in Bookings Invoicing, these fields are left blank. For this example of a non-bookings invoice, the revenue account must be entered at some stage. If the Revenue from all lines of this invoice is going to be posted to the same revenue account, then the branch/department/account can be entered here. If the revenue account is going to change on a line by line basis in the invoice, then these fields can be left blank and the revenue accounts entered for each line of the invoice.
|
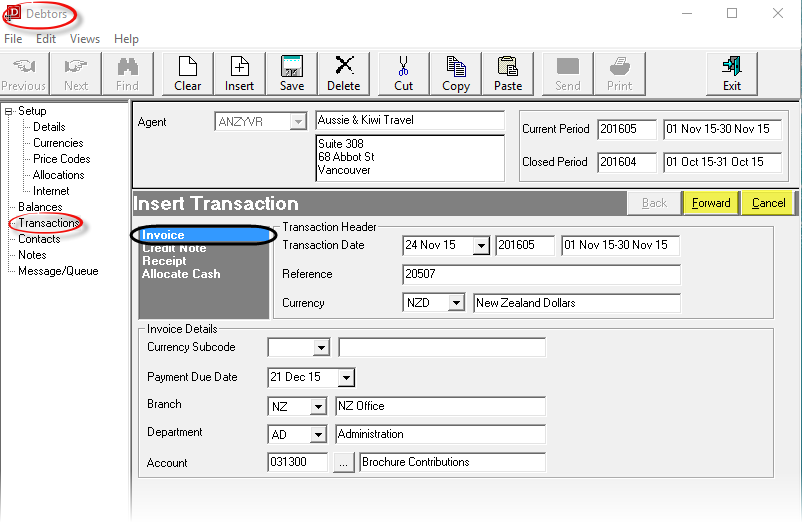
Screen Shot 28: Debtors Invoice Header Screen–Completed Example.

|
Click the Forward Button (highlighted yellow) on the Wizard Bar to continue. The Invoice Line Detail window will overlay the Transaction Header Screen.
|

|
Click the Cancel Button (highlighted yellow) to cancel the invoice |
Invoice Lines
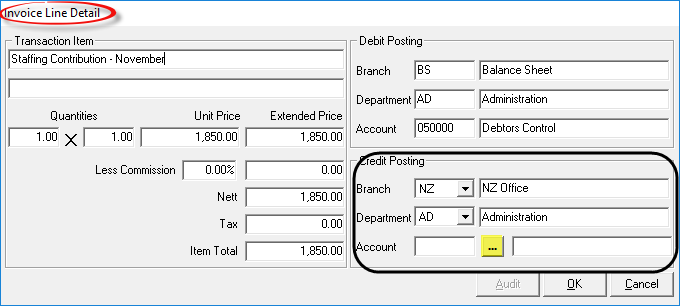
Screen Shot 29: Insert Debtors Invoice Line Detail
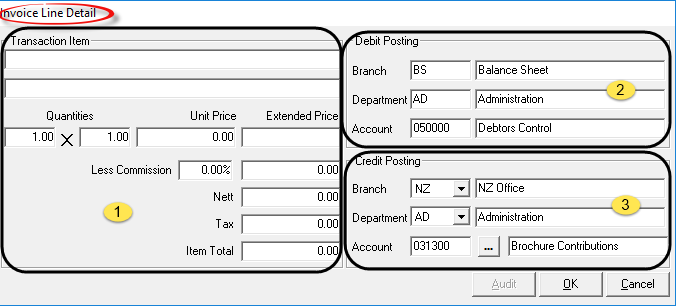
The screen shown in Screen Shot 29 Insert Debtors Invoice Line Detail overlays the main Transaction Screen. It represents one line in the invoice. Multiple lines can be inserted.
 Transaction Item Section
Transaction Item (60 Chars each)
These two lines are for a description of the invoice line to be entered. In Bookings Invoicing, these lines (by default) contain the service option supplier name and the service option description. For a non bookings invoice they are free format text.
Quantities x 2 (Numeric, 12.2 each)
In Bookings Invoices, these two fields contain the first and second charge unit quantities—i.e., 2 Nights x 3 Rooms. For non-booking invoices the use of these fields will vary and do not have to be altered unnecessarily.
Unit Price (Numeric, 12.2)
The cost per transaction quantity 1. If both transaction quantity fields are left at 1, then the Unit Price will also become the Extended Price.
Extended Price (Display Only)
This field displays the result of Quantity 1 x Quantity 2 x Unit Price.
Less Commission (Numeric, 5.2)
A percentage value which will be applied as a commission amount on the extended value. If the debtor has a commission percentage attached in the details screen (see Debtors Application, Details Tab), that percentage value will display in this field. If commission does not apply to this invoice, the value can be removed.
Commission Amount (Display Only)
This field displays any agent commission as a monetary value.
Nett (Display Only)
The total of Extended Price less the Commission amount.
Tax (Numeric, 12.2)
If a tax type has been attached to the currency that this invoice is being issued in (see ), then the tax will automatically calculate in this field. The tax amount can be overridden.
Item Total (Display Only)
The sum of the Nett and Tax fields.
 Debit Posting Section

|
The Debit Posting Account is, by default, the Debtors Control account. This is obtained from INI settings and cannot be changed.
|
 Credit Posting Section
If the G.L. Revenue account was entered in Screen Shot 27 Debtors Invoice Header Screen, then that account detail will display in this field. If the account fields in the header were left blank, or a change needs to be made, then the revenue account can be changed here.
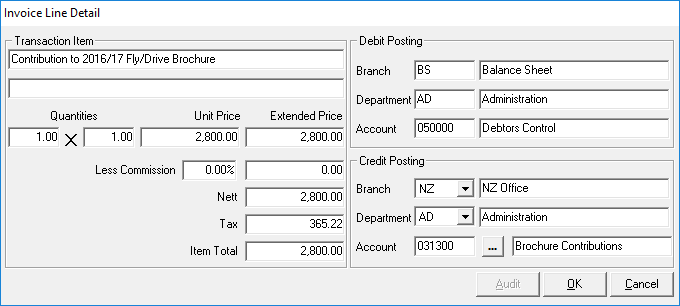
Screen Shot 30: Sample Completed Debtors Invoice Line Detail

|
Click the OK Button to save the invoice line.
|

|
Click the Cancel Button to cancel the invoice line |
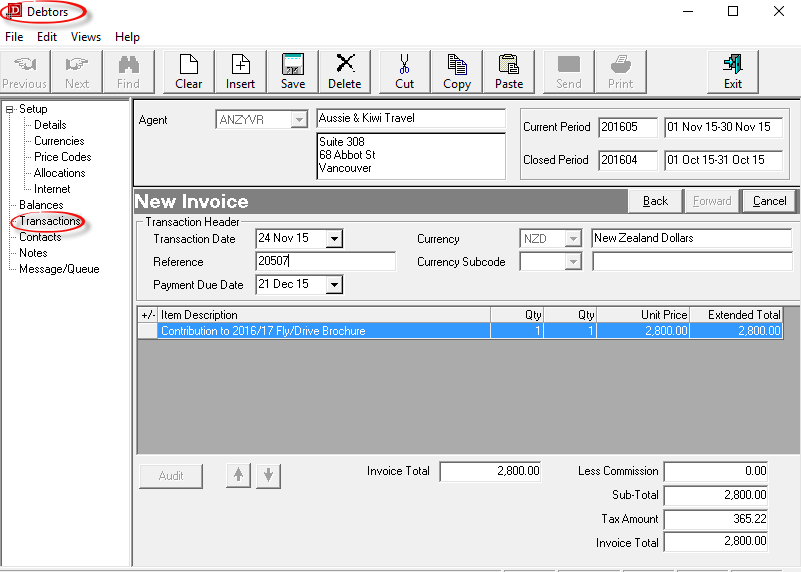
Screen Shot 31: Debtors New Invoice Screen

|
The column headings at the top of the scroll are the only column headings available in this screen.
|
The completed invoice line displays beneath the invoice header details.
Screen Shot 32: Insert Additional Invoice Lines

|
If the Revenue (Credit Posting) account needs to be altered, clear the Credit Posting Branch or Department or Account fields by back spacing the existing data out of them and click the Search button  (highlighted yellow) next to the account field. This will display a list of G.L. Revenue Accountelow). Because the Branch and Department fields were not cleared, only revenue accounts for the NZ AD Branch/Department will display. The displayed list can be altered to include any G.L. account type by checking the appropriate checkbox(es). (highlighted yellow) next to the account field. This will display a list of G.L. Revenue Accountelow). Because the Branch and Department fields were not cleared, only revenue accounts for the NZ AD Branch/Department will display. The displayed list can be altered to include any G.L. account type by checking the appropriate checkbox(es).
|
Screen Shot 33: Select GL Posting Account
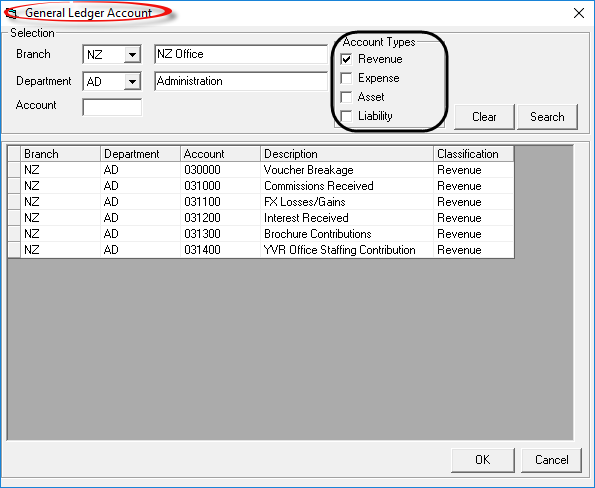
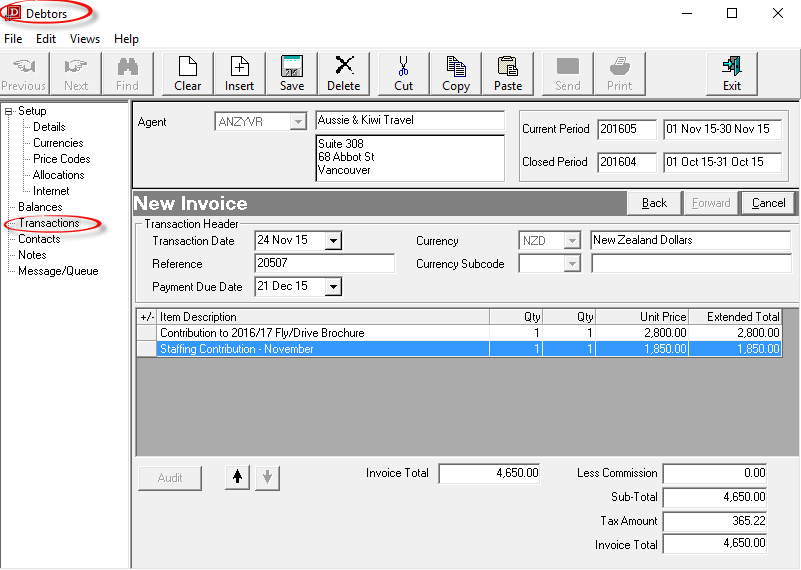
The New Invoice Screen shown in Screen Shot 34 Completed Debtors New Invoice Screen has had two lines added to it.

|
If an error has been made in any of the invoice lines, double click the line to go back to the Invoice Line detail dialogue. To delete a line, highlight the line and click the Delete button  in the button bar. in the button bar.
|
Screen Shot 34: Completed Debtors New Invoice Screen

|
To continue, click the Save button in the Button bar The output transaction selection dialogue as in Screen Shot 35 Output Debtors Transaction Dialogue will display.
|

|
If any item on previous screens need correcting, use the Back button on them New Invoice bar. |

|
To cancel, click the Cancel button on the New Invoice bar.
|
Invoice Output
Screen Shot 35: Output Debtors Transaction Dialogue
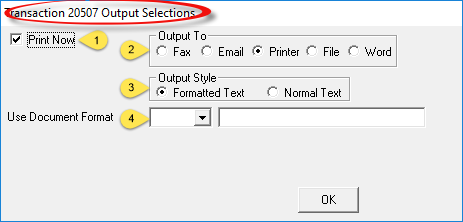
This dialogue box allows the invoice to be output on a document.

|
Valid invoice document template(s) must be set up (System > Messaging) before the invoice can be output. The Tourplan System Setup Training Guide has detail regarding invoice message templates.
|

|
The design of the invoice document template will determine what the invoice will look like in printed/faxed/emailed format. The layout in Screen Shot 36 Invoice Document Display/Edit Screen is not representative of any invoice layout.
|
 Print Now (Checkbox)
If the document is to be output, leave this box checked. If a document is not to be output, uncheck the box.
 Output To (Radio Button)
Output options are Fax (requires Tourplan compatible faxing software), Email, Printer, disk File or MS Word.

|
Document templates must have the correct codes in them to enable the document to be emailed or faxed. Email output requires the email INI settings to be set and MS Word output requires the special MS Word template file to be available. Details of these settings are in the System Setup Training Guide.
|
 Output Style (radio button)
The default is Formatted Text. This means that the invoice document will be output in RTF (Rich Text Format) which includes graphics (if embedded in the document).Normal Text is designed to be used with Dot Matrix style printers which do not offer graphics support.
 Use Document Format (Drop-down)
Select the required document format from the available list.

|
For audit and security reasons, System settings may prevent editing of the document.
|

|
To continue, click the OK button at the bottom right of the dialogue. The Document Edit window will display. |
Screen Shot 36: Invoice Document Display/Edit Screen
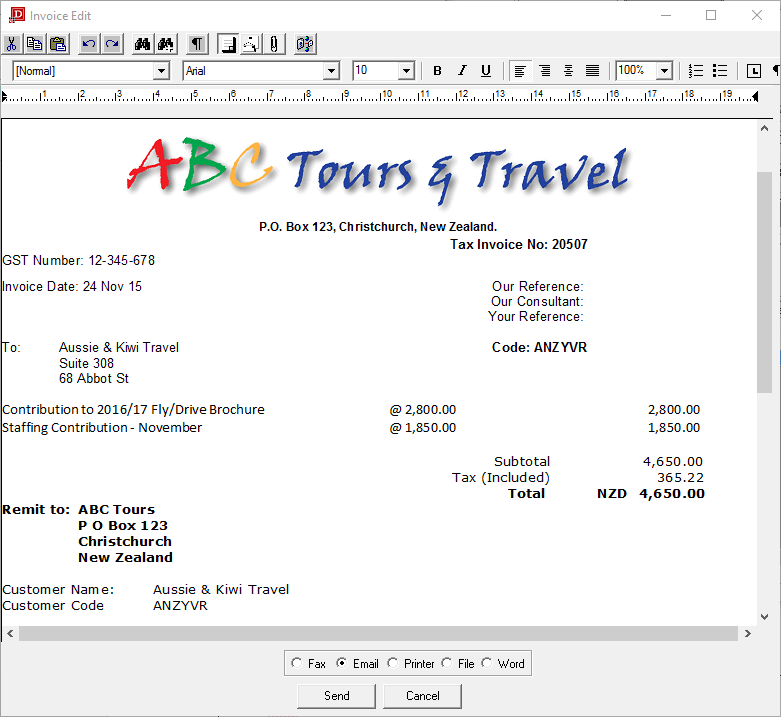
The invoice can be sent via email, to a printer, to a disk file or to fax (requires Tourplan compatible faxing software).

|
To send the invoice document, select the output method and click the Send button. |

|
To cancel, click the Cancel button.
|
On completion (either Send or Cancel), the Transaction List screen is displayed.
Screen Shot 37: Debtors Transaction List Screen
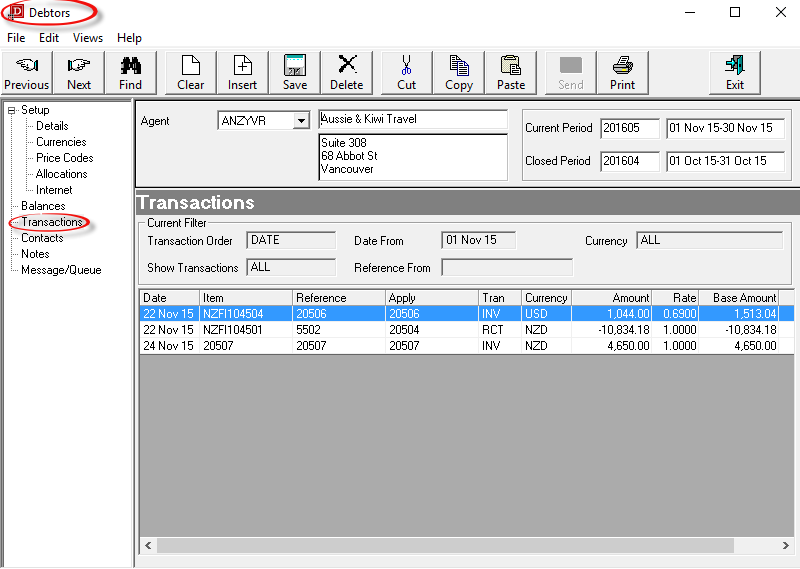

|
The column headings at the top of the scroll are the only column headings available in this screen. Not all columns are visible—use the scroll bar at the bottom of the screen to view the last column Age.
|
|
Heading
|
Displays
|
|
Date
|
The transaction date from the transaction header.
|
|
Item
|
This is either a) in the case of Booking Transactions, the booking reference, or b) for non-bookings transactions, the transaction reference (invoice) number.
|
|
Reference
|
The transaction reference as generated by Tourplan, e.g. the invoice number.
|
|
Apply
|
This is the transaction number against which this transaction has been applied. For Invoice Transactions, Apply is always the same as Reference. For Credit Notes and Receipts, Reference is the Credit Note or Receipt Number and Apply is the Invoice Number that the Credit Note or Receipt applies to.
|
|
Tran
|
The types of transaction are:
- INV: Invoice
- RCT: Receipt
- CRD: Credit Note
- ALC: Allocated cash from Unallocated Receipt
- CHQ: Negative Receipt/Debtors Cheque
System generated transaction types relating to Foreign Currency variations will display after Forex processing has been run.
|
|
Currency
|
The currency of this transaction.
|
|
Amount
|
The amount of the transaction in the currency of the previous column.
|
|
Rate
|
The exchange rate used in the transaction to the system base currency.
|
|
Base Amount
|
The amount of the transaction in system base currency.
|
|
Age
|
The debtors accounting period into which this transaction will age.
|

|
To change details of a transaction double click on the Transaction Line. This can only be done provided the transaction is in an open period.
|
(continued in Debtors Transactions)
Open topic with navigation

 in the Button bar. From the Insert Transaction screen displayed, select Invoice.
 Transaction Header Section
 Invoice Detail Section


 Credit Posting Section


 (highlighted yellow) next to the account field. This will display a list of G.L. Revenue Account
 in the button bar.

 Print Now (Checkbox)
 Output To (Radio Button)
 Output Style (radio button)
 Use Document Format (Drop-down)

